
Telnet is usually used to connect to the server with of the same name, focuses on a protocol that allows of remote access, and generally from port 23, services of all kinds. However, only a small percentage of users when using Telnet f, and most certainly never even heard about it. On the other hand if there is a GUI-based remote administration tool is used decent amount of of bandwidth consumed.
Telnet client doesn’t install by default on Windows 8 operating system. If you type ’telnet’ in Windows 8 command prompt, it will return an error as ’not recognized as an internal or external command’.
But, you can activate Windows 8 Telnet client as below step. There are no installation CD/DVD or download required for this, it is just like a hidden feature, which should be enabled. Besides that, an exception rule for Telnet along with its default port number (TCP 23) is automatically added to Windows Firewall.
Plus more, elevated privileges (Administrative credentials) you must be used to enable Telnet Client/Telnet Server in Windows 8.
How to Install and Enable Telnet Client on Windows 8:
1. Navigate to Windows 8 Control Panel.
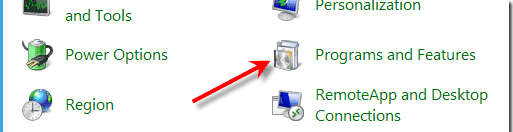
2. Click on Uninstall or Change a Program on Windows 8 control panel.
3. Once the program open, Click on Turn Windows Features On or Off on the left hand side of the Windows.
4. Ok, we proceed to step fourth, once the Windows features appear, Click on Telnet Client or you can choose Telnet Server option together.
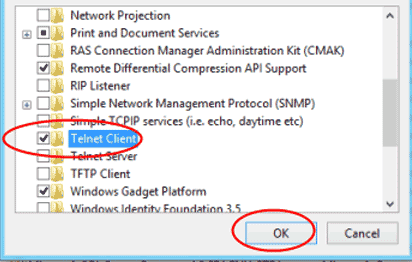
5. Click”OK” button. Then Windows 8 Telnet will be installed.
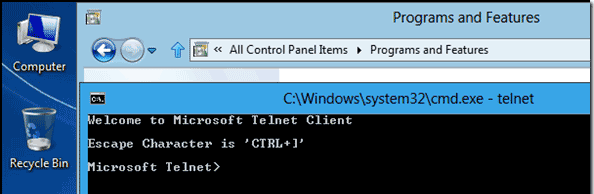
6. There is no need for restarting Windows 8. You can directly access telnet from the command prompt by typing “telnet” without the quotes.
Source
Here is a 2 minute video in YouTube explaining how to activate Telnet on Windows 8/7.
ReplyDeletehttp://www.youtube.com/watch?v=ATD9r0EeYmQ&feature=g-crec-u
thanks bro, that is hlepfull.. :)
DeleteTips yang bagus dan bermanfaat sob :)
ReplyDeleteok deh sob,,
DeleteTalnet itu berfungsi buat apa ya sob ? kok kayaknya baru tau
ReplyDeleteuntuk virtual koneksi.. :D kalo gk salah heheh
Deleteemm gitu ya ? ok lah nuwun pengertiannya :D
Deleteyoi men,, sama-sama..
Deleteberkunjung kemari, sambil baca artikel menarik ini :)
ReplyDeletehihi nakasih sob,,
Deletewhat's this o.O
ReplyDeletehuu whos that??? wkwkk
Deleteyes yes hahahahaha :D
Deletewhat what
Delete